Showing posts with label baking. Show all posts

12.15.2009

First Success


So sorry for the iPhone picture, but it's all I had at the time, and I was too excited to miss the moment. I had my first gluten free baking success! It only took 3 tries at a relatively simple scone recipe to convert it to gf and still have something that stayed together when picked up...and didn't run all over the oven when baking. I really under estimated the complexity of gluten free baking and any of you that are reading this who've been doing the gf baking thing much longer than I, you're probably thinking, "well duh". I know, I read it over an over again, that it's a process, and takes time to get the flour combinations just right and the fat, to baking soda combinations just right, but i still went on confidently thinking it just couldn't be that hard...there has to be a magic substitution that works for everything, and, well, that's just not the case.

So over the last several weeks, while the posting has been sparse, I've been experimenting, and failing, at baking gluten free. I have found some great, although expensive, prepared gluten free food, and have also learned quite a few tolerable restaurant options..including navigating through a company Christmas party held at an Italian restaurant of all places. Anyway, I have many other adventures and failures to share, but I wanted to start with a success...(I hope it wasn't just a fluke!)

Cranberry Cream Scones
adapted from Smitten Kitchen (as usual!)

2 1/2 cups gluten free all-purpose flour mix (I used Pamela's Baking Mix)
1 teaspoon xanthan gum
1/2 cup sugar
3/4 tablespoon baking powder (1 if using a gf or g flour mix that doesn't include baking powder)
1/2 teaspoon salt
5 tablespoons cold unsalted butter, cut into small cubes
1 1/4 cups dried cranberries
1 large egg
1 large egg yolk
1 cup heavy cream

Preheat oven to 400°F.

Whisk flour, 1/2 cup sugar, baking powder, salt, and xanthan gum together in large bowl. Drop in ice cold butter cubes and cut in with pastry blender (or you can use a food processor if you're afforded such luxuries...but I'm not judging) until mixture resembles coarse meal. Stir in cranberries and put back in refrigerator.

In another small beat egg and yolk until foamy and stir in cream. Remove flour mixture from the refrigerator add egg mixture to flour mixture and stir until just combined.

On a well-floured surface with floured hands pat dough into a 1.5-inch-thick square and with a large knife or pizza cutter cut into 8 wedges. Place wedges about 2 inches apart from each other on a piece of parchment paper and stick in the freezer for 15 minutes (if freezing for later use wrap in plastic wrap and stick in freezer bag at this point after the initial 15 minute freeze). Pull out of the freezer and place, with parchment paper, on baking sheet. Bake for 15 minutes until golden brown.

Remove parchment paper with scones from hot baking sheet and serve warm.

Keep refrigerated individually wrapped in plastic wrap and foil.

11.14.2009

Raspberry Cake

I am unfortunately not feeling all that creative at the moment. It's been kind of a blah day. I don't feel like I've been particularly productive today, and I need my Saturday's to feel productive, because if not, then it becomes Sunday which is the day before the next work week starts so I feel pressure to relax, but I also have to get done all of the things that needed to get done on my two, tiny, fly-by, days off from work! Guess I should get over it and go be productive. However, I have one I'm-too-old-but-still-watch-highschool-drama tv shows to watch that has been sitting on the bf's dvr since Monday...yeah, I think I'll do that instead...

But first, Raspberry cake. We neeeded a dessert. We had eggs, flour, buttermilk...and raspberries. So what better to whip up than a raspberry cake. From start to serving plate took about 1 hour (if you like warm cake..which I happen to love)

Raspberry Cake
recipe adapted a smidgen from Smitten Kitchen

1 cup all-purpose flour
1/2 teaspoon baking powder
1/2 teaspoon baking soda
1/4 teaspoon salt
1/2 stick unsalted butter, softened
2/3 cupplus 1 1/2 tablespoons sugar, divided
1/2 teaspoon pure vanilla extract
1 large egg
1/2 cup buttermilk
1 cup fresh raspberries*

Preheat oven to 400°F. Butter and flour a 9-inch round cake pan.

Whisk together flour, baking powder, baking soda, and salt and set aside. In a larger bowl, beat butter and 2/3 cup sugar with an electric mixer** at medium-high speed until pale and fluffy, about two minutes. Add egg and beat well.

At low speed, mix** in flour mixture in three batches, alternating with buttermilk, beginning and ending with flour, and mixing until just combined. Using a spatula to aid, empty bowl of batter into cake pan and smooth top. Drop raspberries evenly over top and sprinkle with remaining 1 1/2 tablespoons sugar.

Bake until cake is golden and a toothpick inserted into center comes out clean, 20 to 25 minutes. Cool in pan 10 minutes, then turn out onto a rack and cool to warm, 10 to 15 minutes more. Invert onto a plate.

* I didn't measure my raspberries, I just used a whole carton.

** My stand mixer was dirty...and had been for two days. As I hate doing dishes, I chose to do the beating by hand. I probably didn't beat it for for the durations listed, but no harm was done.

11.02.2009

NaBloPoMo

So, today is November 2nd..and I happened to post yesterday, so when I discovered that November is National Blog Posting Month I was free to join (as long as I post today...and every day for the rest of the month!) Well, I'm not promising anything, but we'll see how it goes.

We had a lot of snow last week.


I ended up going to work every day, unfortunantly, and the roads were a mess...but the trees were beautiful. The evergreens where prettier than this leafless one..but this one happened to be in the parking lot and I could get a picture of it without wondering outside into the cold wet stuff...so it will have to do.

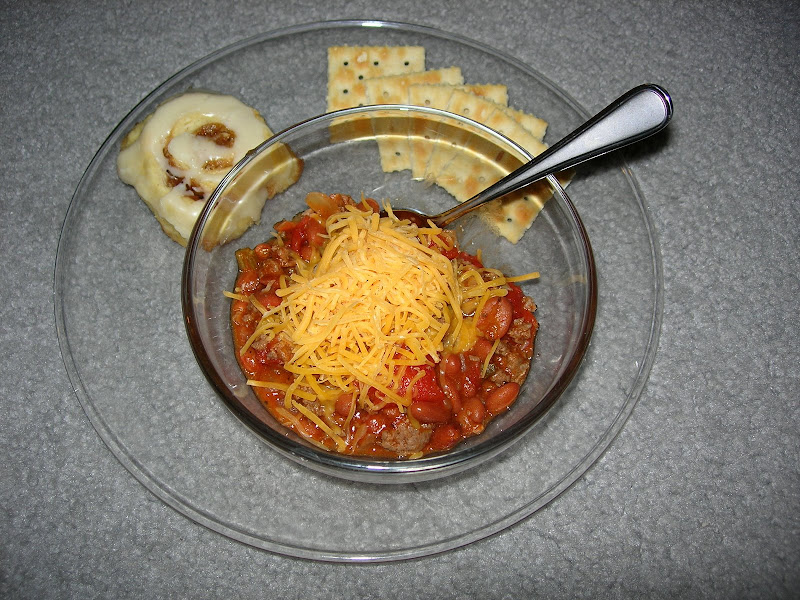
And what goes perfectly with a snowy cold night?...Chili and cinnamon rolls.

I needed the cinnamon rolls to be a quick baking exercise so went with a yeastless variety. They lacked the gooey, chewiness of a good risen roll, but they were fresh and warm and cinammony and buttery and frostingy..and perfect.

No Yeast Cinnamon Rolls
Made up by me...but resembles many online recipes


Dough:
1-1/4 C flour
1 stick cold, unsalted butter, cubed
1/2 tsp salt
1/2 C Milk

Filling:
1/4 C cinnamon
1/2 C brown sugar
2 T melted butter

Frosting:
2 T butter or margarin, melted
3 T softened cream cheese
2 T milk
2 C Confectioners Sugar

Wisk the flour and salt together. Add the cubed butter and cut in until pea sized. Add in the milk a little at a time while mixing with a spatula. When the dough starts to come together, ditch the spatula and get in there with your hands.


Pull dough together and turn out on a floured flat surface. Roll into a long rectangle about 1/4 inch thick.

Spread melted butter out on the dough. Add the brown sugar next (I actually didn't measure...use as much or as little as you want). Sprinkle evenly and then add the cinnamon in the same manner. Roll from the long side of the rectangle towards you so that when you have it rolled up it looks like a long dough snake. Cut into 1" segments and place in lightly greased 9" cake pan, or pyrex, or cookie sheet...I like to have the edges touching so they stay together instead of spreading out. Bake at 350 for 15 - 20 minutes until just starting to turn golden on top.

While they cook mix together the cream cheese frosting by beating the butter with cream cheese. Then add the milk and continue stirring until well combined. Add the sugar and stir until all lumps are gone. Mixture should be thick, but will drizzle off of a spoon. Drizzle frosting on rolls while still hot. Serve warm. Makes 12 small rolls.

10.24.2009

Apple Cider Doughnuts

My day started off with excitement at the possibility of finally aquiring a furry friend. I've been wanted a dog forever. I talk about it all the time and about every 6 months decide I'm really going to get one...Then, like today, the voice of reason (better known as the bf) steps in and reminds me of all the work it will take and how I have a job career that takes me away from the house at a minimum of 11 hours per day.


image and puppies available at Carm's Kennel


Oh what's a dog lovin girl to do. Pay $18 per day for doggie day care...not sure I love her that much, or make her hold her pee for 11 hours every singe day of her life. Doesn't sound like a good situation. So again today, I sounded all of the alarms (called my mom, and the breeder) and then once again realized that it just doesn't make sense. So, I made doughnuts instead.


Apple Cider Doughnuts
...or Donuts ( but I think doughnuts feels more...homemade)

This recipe is all over the blogosphere and a simple google search will give you quite a few options for doughnuts very similiar to these. They all looked about the same.

Recipe adapted barely from here or here

1 cup apple cider
1 cup sugar
4 teaspoons unsalted butter at room temperature
2 large eggs
1/2 cup buttermilk
3 1/2 cups all purpose flour
2 teaspoons baking powder
1 teaspoon baking soda
1/2 teaspoon cinnamon
1/2 teaspoon salt
1/8 teaspoon nutmeg
Vegetable oil or shortening for frying

Glaze:
2 T Apple cider
1 cup confectioners sugar

Boil the apple cider in small saucepan until it is reduced to 1/4 cup (15-20 minutes).

While the apple cider is reducing combine flour, baking soda, baking power, salt, cinnamon, and nutmeg. Set aside.

In a large bowl, or stand mixer with paddle attachment, beat the sugar with the butter until smooth. Beat in the eggs 1 at a time. Turn the mixer to low and gradually add the buttermilk and reduced apple cider until just incorporated. with the mixer still on low, add the flour mixture until dough just comes together.

Turn the dough out onto a generously floured, parchment lined cookie sheet (or the largest flat object you have that will fit in the freezer...I used a cutting board.) Using your hands, pat the dough into a flat sheet about 1/2 inch thick. Place in freezer to firm up for about 20 minutes.

Heat enough oil or shortening to fill the pan up about 3 inches. Insert a candy thermometer and heat until the oil reaches 350˚F (do not overheat oil)

Prepare glaze while oil is heating. Combine 1 cup confectioners sugar with 2 tablespoons of apple cider. Wisk until combined and smooth.

Remove dough from freezer and cut out doughnuts using a 3 inch round. Cut out the center with a 1 inch round.


Place a couple of doughnuts in the oil at a time and cook until golden brown on each side (60 seconds on first side, 30 seconds on second).


Remove and place on paper towel lined cookie sheet. let cool for 1 minute then dip top of doughnut in glaze.

Serve immediately or let cool, store in an air tight container and warm before serving.

Recipe yields 18 doughnuts

10.19.2009

Pumpkin Pie


I've never really loved pumpkin pie. I love the idea of it. I love fall. I love cinnamon and nutmeg, but I always seem to be disappointed when it comes to pumpkin pie. Never as good as I have it built up to be. That is, until I met this recipe. This pie is delicate and delicious. No heavy thick over spiced pie here...just light and fluffy perfection, if I do say so myself.


So this pie was produced..in two hours instead of the usual 30 minutes it takes to whip up a traditional pumpkin pie..., but worth every second as proven by the tiny wedge remaining (need I remind you I only share these recipes with one other person) only 2 days after the baking was completed.

Try it. Seriously. You'll never go back.


Adapted from Cook's Illustrated, November 2008

Pumpkin and Yam Pie

A half-recipe of your favorite pie crust, I used and always use this one.

1 can evaporated milk (12 oz.)
1/2 cup heavy cream (to create a total of 2 cups liquid)
3 large eggs plus 2 large egg yolks
1 teaspoon vanilla extract
1 (15-ounce) can pumpkin puree
1 cup drained candied yams from 15-ounce can
3/4 cup sugar
1/4 cup maple syrup ( I used grade A...worked fine)
1/2 teaspoon ground cinnamon
1/4 teaspoon ground nutmeg
1 teaspoon table salt (I know it seems like a lot..but do it anyway)

Preheat oven to 400 degrees F.

Roll out dough to make 12-inch circle about 1/8-inch thick. Fold loosely in half, then in half again. Place in center of pie plate and unfold. Trim so that there is about 1 inch overhanging the pie plate. Gently push the dough down into the edges of the pan. Trim overhang to 1/2 inch and fold under so that all dough is flush with the edge of the pie plate. Flute or press seal the edges with fork tines. Refrigerate dough-lined plate until firm, about 15 minutes.

Remove pan from refrigerator, line crust with foil and fill with pie weights (I use pennies...way better use of my money than buying pie weights..don't you think?). Bake for 15 minutes. Remove foil and weights, rotate plate. Bake 5 more minutes or until crust is golden and crisp. Remove and place on top of stove to keep warm until filling is ready.

The delicious filling:
While crust is baking, whisk cream, milk, eggs, yolks and vanilla together in bowl. Combine pumpkin puree, yams, sugar, maple syrup, cinnamon, nutmeg and salt in large saucepan (it suggests heavy-bottomed..all I have is cheap aluminum..worked just fine). Bring to simmer over medium heat and continue, stirring constantly and mashing yams against sides of pot, until thick and shiny (it's always thick..I didn't notice much change in consistency..but did get shiny), 10 to 15 minutes.

Remove pan from heat. Whisk in cream mixture slowly, until fully incorporated. Strain mixture through fine-mesh strainer set over bowl (I re-used the milk mixture bowl...I hate dishes), using back of ladle or spatula to press solids through strainer. Re-whisk mixture and transfer to still warm pie crust. Return pie to oven and bake for 10 minutes. Reduce heat to 300 degrees. Continue baking until edges are set (instant-read thermometer inserted in center registers 175 degrees), 20 to 35 45 minutes longer. Transfer pie to wire rack and cool to room temperature (don't refrigerate or pie may not finish setting up).

Serve at room temperature with whipped cream. Store in refrigerator...should last in there until it's been completely devoured..but haven't actually experimented with it.

Enjoy!

9.29.2009

Working out and Eating Cake?!


The week is off to a great start. I went into the office over the weekend and got caught up on a lot, which is making it sooo much easier to not get behind this week. Hope that trend continues.

Last weekend a long time friend came into town. We gabbed and gabbed and gabbed (the bf was shocked since I don't show that side of myself very often). We had a great time catching up and devising a plan to stick to a workout for 90 days. Yes, you've seen the infomercial on Saturday mornings and late week nights, don't be embarrassed. I'm talking about P90X! I think I watched the infomercial in it's entirety twice thinking I'd never be able to keep up with such a strenuous workout routine, but with renewed focus on working out we decided to commit to it. I'm happy to report that I'm on day 9 and it's going really well. Really well in the fact that I can still walk :) I'm sore every day, but feel a little sense of accomplishment after every workout. I know I'm only on day 9 of 90, but one day at at time is my motto. I was hesitant to post about it since I really really want to go the whole way, but to date have not been very good at following through on work out regimens, but here's to changing all that. And for added motivation the bf has promised a great prize if I make it through the entire 90 days without missing a single workout! (there are repercussions for not making it the whole 90 days as well..but I'm trying to just focus on the positive...) Which will be a challenge considering I just signed up for a basketball league on Sunday nights and to run 7 miles in a relay marathon coming up in mid October. But the pay out to the bet will be worth it! More hints on the grand prize to come...

Speaking of the bf, he has a birthday coming up next week. I fully intend on making one of these...

Image from SmittenKitchen

I'll post a picture of my version of the cake, but don't get your hopes up, I'm sure it will only vaguely resemble the above picture, but hey, it's the thought (and taste!) that counts..right? He loves peanut butter..and I love chocolate, and who am I kidding here, I will eat more of it than him.

I really don't have a plan for the day other than that. I guess I better get a plan...

9.10.2009

Peach Pie


The pie turned out wonderfully if I do say so myself. So wonderfully that it was consumed, in its entirety in 3 days by just 2 people...which is why I shouldn't enjoy cooking and baking; especially the baking, so much. I made another just 4 days later and shared it with the in-laws who were in town the night before we all headed out for wonderful sunny, west coast laid back, California...but that's another post for another day.

Today I want to share with you the pie. It started off with the perfect pie crust. I followed the instructions found here to a T because of the fear of pie crusts my mother had instilled in me. However, even if some of my butter chunks were a bit larger than some of my other butter chunks and when I rolled it out it really didn't resemble a circle and had quite jagged edges, a perfectly 12" round was still extracted from it's amoeba-ness and baked up just perfectly (or good enough). I kinda made up my own filling concoction after reading a dozen different recipes for peach pie filling. I decided you really couldn't go wrong with juicy fresh in season peaches. I added 1/4 Cup less sugar than most recipes called for, I really dislike the overly sweet pie, and added in a bit of cinnamon, and of course dredged the peaches in flower first, smooshed it all together piled it in the chilled pie crust and dotted with butter.


Then, because one can never have too much crust and my philosophy is go big or go home, I finished with a lattice top. It may not have turned out looking like the the previous post's picture, but it was fairly good and tasted really good. I rolled out my second chilled round of butter chunked dough and cut it into strips. Then laid them across the top in a weave fashion and as tight as possible because there is no such thing as too much crust!


Anyone that's ever had a fear of pie, fear no more. Run and grab up some of the last juicy in-season peaches of the summer and you will be praised for your efforts.


8.07.2009

Pie Crust


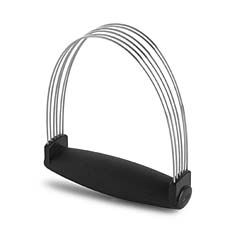
My grandmother, make that grandmothers, would be so proud. I just made a pie crust using one of these beauties.

Making a pie has been my domestic focus of this entire week. I got the itch while reading a great food blog, smittenkitchen. Definitely check it out. The pictures make me want to quit my wonderful engineering job and cook and bake full time in a tiny quaint perfectly decorated and organized, a touch retro a touch whimsical, kitchen...but for now I'll just stick with trying to make a peach pie that my bf will eat. Hopefully when I'm done it will look like hers.
I'll let you know how it actually turns out...